分类 vue-element 下的文章

element ui 表单操作

1.日期选择器

date.png

例子:

   <el-date-picker
      v-model="dateRange"
      size="small"
      style="width: 240px"
      value-format="yyyy-MM-dd"
      type="daterange"
      range-separator="-"
      start-placeholder="开始日期"
      end-placeholder="结束日期"
    ></el-date-picker>
   设置默认日期:dateRange: [this.getNowTime(new Date() - 86400000 *10), this.getNowTime(new Date())],
    getNowTime(temp) {
        var now = new Date(temp);
        var year = now.getFullYear();     //得到年份
        var month = now.getMonth() + 1; //得到月份
        var date = now.getDate();         //得到日期
        month = month.toString().padStart(2, "0");
        date = date.toString().padStart(2, "0");
        return `${year}-${month}-${date}`;
      },

2.复选框和单选框

3.下拉选择框


<el-form-item label="类型" prop="type">
              <el-select v-model="form.type" placeholder="请选择类型(支出/收入/收款/付款/转账)">
                <el-option
                  v-for="dict in typeOptions"
                  :key="dict.dictValue"
                  :label="dict.dictLabel"
                  :value="dict.dictValue"
                ></el-option>
              </el-select>
</el-form-item>
//设置默认值   
 created() {
    // 如果你想设置一个默认值,可以在组件创建时赋值
    this.form.selectedOption = this.options[0].value; // 设置默认选中第一个选项
  },

按钮
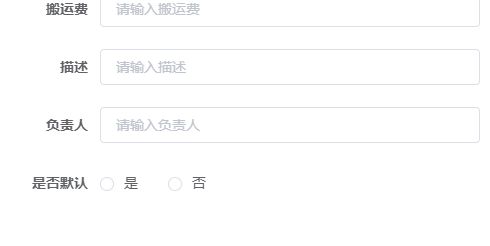
radio.png

 
  <el-form-item label="是否默认">
          <el-radio-group v-model="form.isDefault">
            <el-radio
              v-for="dict in isDefaultOptions"
              :key="dict.dictValue"
              :label="parseInt(dict.dictValue)"
            >{{dict.dictLabel}}</el-radio>
          </el-radio-group>
  </el-form-item>

js:

this.getDicts("isDefault").then(response => {
  console.log("11111111"+response.data);
  this.isDefaultOptions = response.data;

});

element | el-input 绑定点击事件

@click.native

table行编辑事件

:@row-click

<el-table :data="yshopPurchaseOrderItemsList" @row-click="selectGoods" :row-class-name="rowYshopPurchaseOrderItemsIndex" @selection-change="handleYshopPurchaseOrderItemsSelectionChange" ref="yshopPurchaseOrderItems">

      <el-table-column type="selection" width="50" align="center" />

</el-table>

table 新增行 弹窗事件

参考文档:https://juejin.cn/post/7040046051306242085

https://blog.csdn.net/lh1144151563/article/details/122601746

前端相关

 // 图片数量限制
    limit: 1,
    //页面上存的暂时图片地址List
    fileList: [{url: ""}],
    //图片地址
    imageUrl: "",
    dialogVisible: false,
    imgUpload: {
      // 设置上传的请求头部
      headers: {
        Authorization: "Bearer " + getToken()
      },
      // 图片上传的方法地址:
      url: process.env.VUE_APP_BASE_API + "/system/articles/upload",
    }

<!--:action里面放图片上传调取的后台方法 :headers设置上传的请求头部,使请求携带自定义token,获取访问权限 -->
<!--:on-success图片上传成功后的回调方法,用于拿到图片存储路径等信息-->
<!--:before-upload图片上传前的逻辑判断,例如判断图片大小,格式等-->
<!--:on-preview图片预览方法 :on-remove图片删除方法 list-type代表文件列表的类型 -->
<!--file-list存放成功上传图片列表,这里此属性用于修改功能时页面已有图片的显示-->

<el-form-item label="预览缩略图" prop="articleImg" label-width="40">

<el-upload
            :action="imgUpload.url"
            :headers="imgUpload.headers"
            list-type="picture-card"
            :limit="limit"
            :on-exceed="handleExceed"
            :on-success="handlePictureSuccess"
            :before-upload="beforeAvatarUpload"
            :on-preview="handlePictureCardPreview"
            :file-list="fileList"
          >
            <i class="el-icon-plus"></i>
          </el-upload>
          <el-dialog :visible.sync="dialogVisible">
            <img width="100%" v-if="imageUrl" :src="imageUrl" alt="">
          </el-dialog>

</el-form-item>

图片上传地址:ip/upload

@Log(title = "文章图片上传", businessType = BusinessType.UPDATE)
@PostMapping("/upload")
public AjaxResult avatar(@RequestParam("fileimg") MultipartFile file) throws IOException
{
    if (!file.isEmpty())
    {
        LoginUser loginUser = tokenService.getLoginUser(ServletUtils.getRequest());
        String imgurl = FileUploadUtils.upload(XJConfig.getUploadPath(), file);

        AjaxResult ajax = AjaxResult.success();
        ajax.put("imgUrl", imgurl.substring(1));

        return ajax;
    }
    return AjaxResult.error("上传图片异常,请联系管理员");
}

返回信息

msg: "操作成功", imgUrl: "profile/upload/2022/05/15/3b59f532-e6f3-4396-a478-895b86750777.png", code: 200}
code: 200
imgUrl: "profile/upload/2022/05/15/3b59f532-e6f3-4396-a478-895b86750777.png"
msg: "操作成功"

图片上传前的相关判断

beforeAvatarUpload(file) {
  const isJPG = file.type === 'image/jpeg' || file.type == 'image/png';
  const isLt2M = file.size / 1024 / 1024 < 5;
  if (!isJPG) {
    this.$message.error('上传头像图片只能是 JPG/PNG 格式!');
  }
  if (!isLt2M) {
    this.$message.error('上传头像图片大小不能超过 5MB!');
  }
  return isJPG && isLt2M;
},
//图片预览
handlePictureCardPreview(file) {
  console.log("444444444444",file);
  this.imageUrl= file.url;
  this.dialogVisible = true;
},
//图片上传成功后的回调, file
handlePictureSuccess(res) {
  //设置图片访问路径 (articleImg 后台传过来的的上传地址)
  console.log("111",res.imgUrl);
  this.$forceUpdate();
  this.imageUrl= process.env.VUE_APP_BASE_API +res.imgUrl;
},

// 文件个数超出

handleExceed() {
  this.$modal.msgError(`上传链接LOGO图片数量不能超过 ${this.limit} 个!`);
},
/** 提交按钮 */
submitForm() {
  this.$refs["form"].validate(valid => {
    if (valid) {
      if (this.form.id != null) {
        updateGoods(this.form).then(response => {
          this.msgSuccess("修改成功");
          this.open = false;
          this.getList();
        });
      } else {
        addGoods(this.form).then(response => {
          this.msgSuccess("新增成功");
          this.open = false;
          this.getList();
        });
      }
    }
  });
},

https://www.cnblogs.com/springclout/p/16066242.html
https://blog.csdn.net/qq_44872773/article/details/124232965

需求:

element-ui dialog弹窗设置点击空白处不关闭

描述

element-ui dialog弹窗 默认的点击空白处也就是非弹窗区会关闭,这在绝大部分情况下是非常不合适的,会造成弹窗中的数据清空。

我们将该属性改成只能点击右上方叉号关闭。

也就是“:close-on-click-modal” 这个属性设置成false 就可以了

代码

<el-dialog title="添加" :visible.sync="dialogFormVisible" :close-on-click-modal="false">
</el-dialog>